Pages

Showing posts with label crafty. Show all posts

Friday, June 29, 2012

Doilie M Wall Hanging


A couple months back I scored a great deal at a garage sale - a paper grocery sack over half full with doilies of different sizes for only $5.  A lot of them were really small and I had a vision in of putting them on canvas in the shape of an M for Baby Whimsy's room.  Then about a month ago, I found a framed piece of canvas artwork that was the perfect size to re-purpose for my needs (don't worry, I googled the art before painted over it to make sure it was not a masterpiece.  It wasn't - in fact it was just printed on the canvas, not even really painted.). Even better, it cost the whopping total of $1.


My goal was to have the background to be pink but not to look perfectly painted.  I wanted different shades of pink and white to kind of streak through the piece (if that makes any sense).  I am not an artist and I do not paint so this was a foreign venture for me but I went into it with the mindset that there was not a right or wrong way to create art (plus it cost only $1 and I knew if I messed up I could have my sweet sister paint something for me).  

Supplies needed: 
old canvas
white craft paint
pink craft paint (different shades)
paint brush

The first step in the project was the paint over the existing art.  I first did a plain white coat because the piece was originally pretty dark and I did not want the dark colors to show through in the end.  

Once that dried I literally just randomly squirted out paint in shades of pink and white along the canvas.  I wanted the end product to be less bright pink and more baby pink so I adjusted my colors accordingly.  Then I just used a foam brush and painted in the same direction from top to bottom, until the piece was covered in paint.  At the top (my starting point), there were a few areas that were lacking paint so I went back and re-coated them.  I also added more white (and painted it in using the same direction)  where I thought it looked too pink and vice versa until I was satisfied.  It was really a super easy project and I am sure you guys did not need the above description on! 
(Side note, Mr. Whimsy was very impressed with the end result of just the painted canvas and has encouraged me to look for and buy (shocker) more framed canvases if I see them at garage sales to decorate other areas of the house on the cheap.  I love request to buy more when they come from the hubster!)


Then I just needed to add my doilies but again, I didn't so the project sat and waited another REALLY long time, until I made my nursery to do list.  For the doilie portion, I placed the doilies in a way I thought made the M look the prettiest, then starched them and glued them on the canvas.  The hardest part of the project was getting the M laid out so I was happy with it and the most time consuming was ironing the doilies.  


Overall I am really happy with the result, it was an easy breezy project (once I finally got started) and I think it will look nice in the nursery. 

Wednesday, June 29, 2011

RFI :: Request for Inspiration

I got a ton of the little bottles from a friends mom over a year ago.

Somehow she found them and dug them out of the ground so they were pretty dirty when I got them.

I've cleaned them but don't have a picture of them all clean and shiny... this is halfway there though!

They are old medicine bottles and they are all pretty small (ranging for 2 to about 8 inches). When she gave them to me, I was certain I would find a billion fun uses for them... but I haven't found one yet (to be fair, I forgot about them for about 11 of the months....). I've looked on Etsy, I have checked out blogs and still inspiration escapes me. Any ideas or suggestions?

Monday, June 27, 2011

Too busy to blog!

I have officially not blogged in over a month... pretty pitiful! Tons have been going on, I have just been busy, enjoying outside more than inside (i.e. posting on the blog), and have been travelling a bunch. Seriously I think I have been gone 3-4 days out of the week for the past several weeks. Combine that with the sun going down at 8:30, we typically don't come in until sunset. This results is late nights and short weeks. I am looking forward to spending time with friends and weekends at home. That being said, there has been lots to keep me busy lately.

Some of the highlights of the past month have included:

1. My sweet and smart sister graduated from Texas A&M. Whoop! I am so proud of her.


2. We have found 4, yes FOUR, snakes outside of our house. My resident snake expert (my cousin Jason) says they are harmless water snakes but I am not a fan of ANY kind of snake. They have all been disposed of property. They have all been about the size of an unused pencil and their tail is red on the underside. The scary thing is I have not seen one of these snakes until Joe has pointed them out and they all all is areas that I regularly walk around (outside the front door, my flower bed, under my old red metal chair and just inside the garage). I am working on improving my attention to detail. Joe is looking for a outside cat we could have to keep these nasty critters away.

3. Joe built me 2 big shelves in my laundry room. I needed more pantry/kitchen storage space so Joe added some big shelves above my washer/dryer for kitchen electronics, big platters, and canned goods (to accommodate my couponing habit). This fulfills that need nicely and I am loving the additional space that I have in my regular cabinets.

One shelf down, (err, up), one to go!

4. I have tried canning. My incredibly generous aunt Marilyn is a great gardener and on one of my trips to Brenham, she gave me a giant box filled with tomatoes and a cooler filled with other fresh veggies from her garden. In order to keep these from spoiling, I canned fresh tomatoes and homemade salsa. The tomatoes were relatively easy but a bit more watery than I expected. The salsa tasted great but after working on it for about 3-4 hours, I only got 4.5 cans of salsa. It was definitely not a good investment in terms of time but totally worth it for the experience. I would eventually like to can pasta sauce with some of my fresh basil but that will have to wait. Also, my Aunt Gay Nell said should would have me over to can pickles. I am pretty excited about it.


Box full of tomatoes awaiting their fate


Canned tomatoes


5. Joe and I have been talking a lot about creating an outdoor living area. We have spent a lot of time planning/brainstorming where things could go and what would look best. Will update you with how this progresses over the months to come.


The outdoor area will be at the back of the house around the covered porch


6. I got a Cricut! I am super excited about it even thought i haven't really used it yet... but I will!


7. One of my chickens mysteriously died. In preparation for Aprilfest this year we started building a big bonfire with tree and shrub branches. Due to the burn ban, the bonfire hasn't happened yet. Meanwhile, we noticed that the dogs moved the branches around to make a tunnel going through the pile. During the day the dogs lay in here, their dog house, or in their kiddie pool. When the dogs aren't in their tunnel the chickens take it over. When I got home this past weekend Joe said something must have died in the pile because it was stinking. I jokingly said it was a chicken. Sadly, I found I was correct when I went to count my chickens and found one missing. We shortly spotted the chicken in the pile and got it out. When examining it, it was obvious it had been dead for a couple days but it showed no outward signs of injury. Not sure what happened but maybe a snake bit it? Any ideas?

RIP (the chicken, not the dog)


The bonfire now has tunnels through it and is the (literally) cool hang out spot for my dogs and chickens. This is where we found the dead chicken.

7. We (mainly Joe) have completely re-done our rabbit area. Due to the heat, we have expanded the covering over the rabbit area, installed fans and a misting system in an attempt to keep the rabbits cooler. This seems to be working but it was a LONG processes.

When its in writing it really does not seem like much but it really has been. My sister is getting married in July and that should cut done on some of my traveling (I've been in Brenham a bunch for her showers bachelorette party). I am hoping things will slow down, but honestly, who knows.

Thursday, May 5, 2011

(Almost) New Dresser

A couple weekends ago, I found this old dresser at a garage sale for $20.


I have been looking for a piece like this will all the design and carvings to try out my new glazing process. I got this technique from All Things Thrifty and tried it out with good success on my kitchen cabinets.

A couple days after I got this dresser, I found an awesome spray paint deal - cans were only $1. That pretty much picked my color for me and it was time to get to work.

First step was giving it a dusting and removing the drawers and hardware. Next up, I spray painted it with primer. The change was already amazing.

After spray painting it green I was already loving it. One thing to keep in mind when spray painting something this detailed is to be sure to spray paint from all angles, otherwise the underside of the curves and carving will not get the necessary color.


I gave the paint a couple days to dry hard (only because I was too busy to do it the next day), and I started glazing. For the drawers I used a smaller artist brush so that I could get into all the crevices. On the big, flat areas I used a much bigger brush of course.


I split it up into sections because it took a while to cover all the areas and to wipe it off. Again, you just wipe it with a damp, clean cloth. I rinsed mine a bunch so that I didn't have to go through a billion rags.


On the above picture, you can see the bottom portion is unglazed, the semi circle at the top has the glazed mostly wiped off and the rest of the top has the glaze painted on. The glaze makes it look black and can be a bit concerning but it wipes off easy as long as you have a clean, damp, rag.

Because this piece will not get tons of contact on the painted parts (like my cabinets will) I did NOT use a polycrylic - I just chose not to and so far I haven't had any problems.

I love the finished piece and the extra cabinet space was REALLY needed. Now I am on the lookout for more furniture to glaze! What do you think?

Tuesday, April 26, 2011

Cabinet Re-Do

Since moving into the house, my kitchen cabinets have been one of my least favorite things. They are the standard grade, a mix of real and faux wood. The color is what got me... it reminded me of my college apartments. The darker color made the kitchen seem smaller and very... cookie cutter.

Joe had wanted to do something to the cabinets from the very beginning. I was very hesitant from the beginning. Finally, after many talks and visits to different blogs, I relented.

We both wanted to paint the cabinets white, I wanted to apply a glaze to them that I found on my favorite blog, All Things Thrifty. Brooke at All Things Thrifty does AMAZING things with furniture and her house and constantly inspires me to be more crafty. She also glazes EVERYTHING under the sun. Back to the cabinets though, we though the white cabinets with the black glaze would be a nice touch to the kitchen, would make it seem larger, and would be more our style.

This was my first glazing project so we followed Brooke's glazing steps pretty much spot on, you can find the instructions here. The entire process was not overly complicated, just time consuming.

First step was to paint the cabinets. Because they are inside we could not spray paint (like Brooke recommends). We first removed the doors and drawers then applied a primer then several coats of a high gloss enamel. Joe did this as he is much more detail oriented than I am. With the painting complete, and the cabinets stark white, I applied the glaze.


The hardest part of glazing was actually buying the glaze. We could not figure out which product was correct as Lowes had just changed their paint labels (so I could not compare it to the products shown on All Things Thrifty), and unfortunately, the Lowes employee did not really understand what we were looking for (NOTE: this experience was very different than most Lowes shopping trips because typically I receives TONS of great info from the Lowes employees).

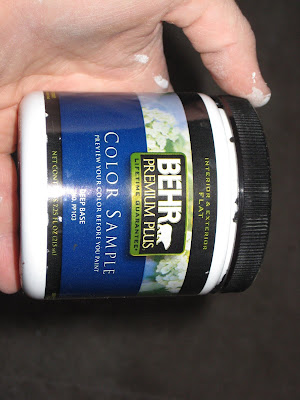
Once we got the correct product (you don't need much, we got a quart and used less than 1/4 of it), it was torture trying to explain that we needed the employee to add the black color to the glaze. The guy pretty much said there was no way to do it without pouring out a quarter of the can of glaze. Instead, we bought the quart and bought one of the tiny color sampler paints in black and mixed the two at the house.

Brooke had mentioned getting the glaze tinted was a problem for her as well so I imagine this is a universal issue and if you want to glaze something you should plan to get the two separate products and mix it yourself.

With the glaze mixed, I applied it to the cabinets. This was my first glazing project ever (heck of a project to start on right?!?!), so there are some errors but overall I think it turned out nice.

After the glaze dried (and we got some time on our hands), we applied a 4 coats of a polycrylic to protect the paint job.

We finished off the project with some glass knobs off ebay (they were a steal at only $2.50 a piece!). I think they really make the project come together.

Once final note, we removed the small cabinets above the stove as well. Joe installed 2 wine glass holders from Target here and presto, the finished project!

After doing this process I know I will be glazing a LOT more in the future... in fact 2 weekends ago I bought a furniture piece for my room that will be getting the glaze treatment very soon.

Thursday, April 21, 2011

Best Find EVER (this month!)

I ventured into the local dollar store this week and found $1 Krylon spray paint... SWEET! They had several colors including celery green, a bright yellow, light blue, and a couple others. I picked up 4 greens and 2 yellows.


This same paint is normal like $3-4 dollars so this is really a steal. Especially because I have been on a huge painting kick lately (as in this week). After loving the green I am going back tomorrow to get several more cans.

I used 2.5 cans of green on a furniture piece I picked up at a garage sale for $20. Here is the before picture (I had already taken some drawers out before I remembered to take a picture).


And a close of up the detail on the furniture piece:

And a sneak peek of it partially painted.


I am planing to glaze it once its painted up. My goal is to have it done and put in my room before Easter. More pics to come soon!


Conroe peeps - I totally recommend stocking up on some of this paint if you have a crafty hair on your head. I got it from the King Dollar on HWY 105 E headed towards Cleveland (its on the east side of 45, past downtown Conroe. The paint is above the cashier. They also had EVOO -extra virgin olive oil - when I went but I heard from Denise at The Rowdy Ramsdens there were only a couple bottles left. It would be worth a look if you stop by though!

Wednesday, March 2, 2011

Stained Glass Project


A while back I had the brilliant idea that I should be able to make a faux stained glass that I could hang in my window and possibly use in some of the windows at the wedding. I did some searches for ways to do this and everything I found required baking, special paint, and frankly lots more work that I was interested in doing. I like projects to be cheap and easy. That being said, I also like my projects to look expensive and not like projects. I decided the faux stained glass windows were not in my immediate future and forgot about the project.

Then I stumbled upon Suzy's Sitcom thanks to my favorite thrifty/crafty blog ever, All Things Thrifty. At Suzy's Sitcom she made faux stained glass windows, with regular elmers glue, clear elmers glue, black craft paint, colorful craft paint, a sharpie and an old picture frame with glass. In essence, these are all materials that qualify for a good, cheap project for me... As long as it was easy.

I painted two glasses, each with a "W" as the center image (first letter of my future last name). I think these turned out ok but but be way better if I had more patience, chose my color scheme more selectively, and put on the coats of paint more thick evenly. Also, the individual color blocks should have been bigger. It took forever trying to paint all the tiny shapes.

Again mine did not turn out great and will not make an appearance at the wedding but I do think its nice in my window.

Anyway, I think this is a fun project - check out Suzy's Sitcom for step by step directions.

Thursday, July 1, 2010

Wedding Weekend!

This past weekend was full of wedding festivities. Friday night started out with me and the three M's (Mom, Meggo, and Marilyn) at the Brides Against Cancer Wedding Dress Event.


The event was... interesting. It started with a runway show complete with a dancing man on stage. Seriously... Check it out!


We tried on lots of dresses but neither Megan or I left with the perfect dress so the search will continue. It was a fun night and a great way to kick of the search for THE DRESS. Thanks for the fun guys!


The rest of the weekend was filled with handiwork and I've got a mean blister to prove it.

Mason jars came out along with 17 gauge wire and I got to work wrapping, twisting, and looping.


All Done!


I am still looking for bunches of these prisms so if you see some cheap (garage sale cheap) please pick them up for me. I am finding them on things like lamps, candle holders, etc.

Thursday, June 24, 2010

No Cake Plate? No Problem!

After (attempting) to make a cake for Joe's big day, I realized I did not have a pretty cake plate to put the finished product on. I've seen tons of cake plates I have liked, I just have not purchased any because they take up too much space in the cabinet. I like to be able to stack things and the pedestal on the cake plate makes it hard to stack.

Something I have tons of is pretty glass plates and other dishes that catch my eye when I am at garage sales. Thankfully I was able to come up with a quick and easy fix for my lack of a cake plate.

All you need to make one of your own is: a pretty plate (that is large enough for the cake to fit on), a glass or ice cream sunday type dish (pedestal not required but its a definite plus), and a hot glue gun.

Note do not use a painted plate or glass.

Place your plate upside down.


Place your glass in the center of the plate (the bottom side). Determine how the glass fits best (it may work best upside down like mine did).

Put hot glue on the plate where the glass will go. I put it on the plate instead of the glass because my aim is not that good. If you have better faith in the sturdiness of your hands, by all means apply the glue directly to the glass.


Place the glass on the plate and push down.

Add more hot glue to any spot that looks like it may need it.


Let the glue cool, then turn the piece right-side up. Wa-la you've got a plate for a cake!


Make sure when you move this plate around that you hold the glass as well as the plate portion of the cake plate, I don't really know how strong hot glue gun glue is.

The finished product. Please do not judge my cake. It looks pretty rough!


Once you are done with your new cake plate, you can unassemble by gently pealing the glue/ glass off the plate.