Pages

Sunday, May 22, 2011

New flower bed!

After my wedding I had a left over metal box spring, some small wooden fence pickets and plants that needed a new home. A new flower bed was in my future.
I planned to put it essentially where the metal flowers are in this picture (I (I as in Joe) moved the metal flowers to the opposite side of the gate).

The box spring came from an old business/house that was being torn down. The owner said I could take anything I wanted and I fell in love when I found this cool piece. At the wedding, it leaned against a tree and was used to hold some of the rose petal cones
The fence pickets came from a garage sale. My wonderful Uncle Carson painted and made the pickets stand up on their own. They were on the stage in Welcome Hall. I took apart the fence pieces, added some metal stakes to them and used them to surround the flower bed.

I then placed the box spring against a T-post (and connected it to the fence with wire), and planted a $3 Lowes clearance Jasmine vine in front of it. With a azela on both sides, society garlic in the front, some small clearance plants and mulch, the bed was almost complete but missing... something.
This bird bath was the missing piece. I got this at an estate sale a year ago and it had been sitting by my garden, in my "need to do something with it" section. A bit of paint later and it was the perfect addition to my new flower bed. Its amazing what some paint can do to something!
I am really loving how the bed turned out and can totally envision the plants grown up and blooming in it. I am especially happy I was able to repurpose some goodies from my wedding to make this bed complete. What type of things have you repurposed and put in your flower beds?

Tuesday, May 17, 2011

Picnic Table Pick Me Up

I bought this wood picnic table at a garage sale over a year ago. Its original rust colored paint job lasted for a couple months but by now, it was in need of a MAJOR paint job. It was peeling and unappealing to use in any way, whatsoever. I was deciding on a color and am a little tired of the dark red/maroon I used a bunch when I first moved in. Instead, I am really loving yellow, pink and green right now... this time yellow won out.

A little sanding, primer, and two coats of left over yellow paint letter I have what appears to be a brand new picnic table. I also applied a couple coats of polycrylic... I am hoping this will help protect it from the weather. I've already gotten use out of the table and know I'll be using it tons more this summer.

Wednesday, May 11, 2011

Raindrops

Texas peeps: In case you forgot what they look like, these are raindrops. I'm praying for lots more!


First Harvest

Last night I got my first harvest from my garden and it was delish!


I know this isn't much compared to Bobbi Jo's, my Aunt Marilyn's (Kristin's mom), Doug's (Jamie's dad), or the countless other super gardeners out there, but so far my garden is doing a billion times better than it has the over my previous two years of semi-unsuccessful gardening. I am hoping this years the trend continues.

This year I've got the following planted:

Green beans
Okra
Peppers (bell, jalapeno and Anaheim)
Tomatoes (several varieties)
Onions
Potatoes
Squash
And a random zucchini that somehow got planted with the squash

In the past, only my peppers and tomatoes produced anything worthwhile so I am super excited to have such a great start to the season.

Also, over the weekend I did a little construction/basket weaving in my garden. I am very tired of the ugly metal stakes used to hold up (or attempt to hold up) my tomatoes and my green beans. The green beans have already completely over grown their stake and the tomato stakes simply look ugly. I decided to make something a little more organic for the garden to fulfill these needs this season.


Two weeks ago when Joe was doing some MUCH needed trimming to our trees, I asked him to set aside some long straight branches. I then used some jute string from Lowes and my best weaving skills and made these stakes for my green beans and 1 set of my tomato plants
By the way, these are my much smaller, younger tomatoes. My other, bigger box full has the metal stakes and is already filled with tons of green tomatoes - woohoo!

So far I am happy with the visual appeal, I just hope they can can stand up (literally) to the weather and the pressure from my plants. If all goes well, at then end of the season I plan to throw these stakes in the fire pit (no more need to store ugly metal stakes!) and start over next spring

Do you have any gardening tips that made your veggie gardens more visually appealing?

Monday, May 9, 2011

Happy Mothers Day

Happy Mothers Day!

My mother is an amazing woman. She consoles, she guides, she leads, she advises. She provides laughter, love, and acceptance.

Mom, I love you. You are an amazing woman, a wonderful mother, and a true friend. I am beyond thankful for you and all that you have done for me. Thank you for being everything, all the time.

Saturday, May 7, 2011

Thank You Husband (for my shoe shelf)!

A while back, my shoe shelf completely collapse on itself. I mean completely collapsed.

I know I have too many shoes (I never throw them away), but I really think these shoe shelf deals are gimmicks. Anyway, my wonderful husband headed to Lowes, picked up some cheap particle board and brackets... and left them in the garage for a couple days (he was out of town for work, not being lazy). Meanwhile, I decided these shelves should absolutely be hot pink so I went to work...

First with primer...


Then I mixed a couple shades of pink paint that were in the garage and painted pink. 
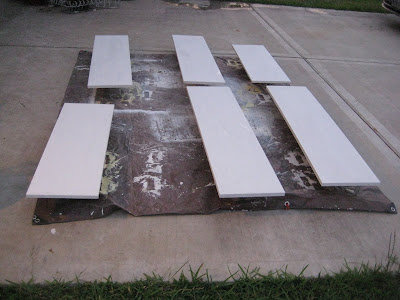
I put 2 coats of polycryic (probably should have done three through), then Joe had some spare time and hung the shelves in the closet.


I organized my shoes and now, my closet is pretty (at least the shoe section is!)!

Thursday, May 5, 2011

(Almost) New Dresser

A couple weekends ago, I found this old dresser at a garage sale for $20.


I have been looking for a piece like this will all the design and carvings to try out my new glazing process. I got this technique from All Things Thrifty and tried it out with good success on my kitchen cabinets.

A couple days after I got this dresser, I found an awesome spray paint deal - cans were only $1. That pretty much picked my color for me and it was time to get to work.

First step was giving it a dusting and removing the drawers and hardware. Next up, I spray painted it with primer. The change was already amazing.

After spray painting it green I was already loving it. One thing to keep in mind when spray painting something this detailed is to be sure to spray paint from all angles, otherwise the underside of the curves and carving will not get the necessary color.


I gave the paint a couple days to dry hard (only because I was too busy to do it the next day), and I started glazing. For the drawers I used a smaller artist brush so that I could get into all the crevices. On the big, flat areas I used a much bigger brush of course.


I split it up into sections because it took a while to cover all the areas and to wipe it off. Again, you just wipe it with a damp, clean cloth. I rinsed mine a bunch so that I didn't have to go through a billion rags.


On the above picture, you can see the bottom portion is unglazed, the semi circle at the top has the glazed mostly wiped off and the rest of the top has the glaze painted on. The glaze makes it look black and can be a bit concerning but it wipes off easy as long as you have a clean, damp, rag.

Because this piece will not get tons of contact on the painted parts (like my cabinets will) I did NOT use a polycrylic - I just chose not to and so far I haven't had any problems.

I love the finished piece and the extra cabinet space was REALLY needed. Now I am on the lookout for more furniture to glaze! What do you think?

Tuesday, May 3, 2011

LindseysWhimsys is now on Etsy!

After my and Joe's wedding invitations went out, I received several comments about how much people like them and how unique they were. This was extremely self esteem boosting for me, as I designed the invitations myself (I did have help from an amazing group of women that helped me assemble them), and was very nervous about their acceptableness as a wedding invitation.


Thanks to these wonderful comments from friends and encouragement from my amazing husband, I have decided to open shop of Etsy and sell these invites, completely assembled, to other brides. The stores name is, of course, LindseysWhimsys.

Hopefully (fingers crossed and prayers sent), the venture will be a fun success. If it is, we already have other ideas of areas to get into including kids name/calling cards, baby announcements, etc. When you get a chance, I would love for you to check out my shop (I only have one item so far but will be adding more), pass along suggestions/feedback, and tell future brides about LindseysWhimsys on Etsy!


The invitations:


And here are the wedding programs:


Monday, May 2, 2011

Wedding Pictures Round 1

First, I would like to apologize for the delay in posting wedding photos to the blog. Because there are so many, and they are so large, they take a long time to upload... so, I will be posting them in phases. Please check back for more photos. Also, if you have photos from the wedding that you would be willing to share, I would LOVE to get them from you!

I absolutely LOVE how everything at my and Joe's wedding turned out. The wedding was totally us, and that is all thanks to amazing helpers/make things happeners, the wedding came together just as I had hoped and included lots of little things that made the day extra special.

Entry to Welcome Hall


The hall itself was amazing (so was the weather, thank you Jesus). Welcome Hall was built in 1899 and usually hosts things in the realm of cattle rides. The building is not air conditioned but is surrounded by great windows on all sides that can be propped open.


My mom handmade pinwheels to give to all the kids during the wedding. We also had large pinwheels in the ground as decoration.


Paper cones were made out of scrapbook paper, filled with rose petals, and placed on each of the chairs before the wedding. These table runners were made of upholstery fabric I found on Craigslist. My AMAZING aunt Marilyn sewed each of these runners for us.


Hankies were passed out to the ladies that attended for their "Tears of Joy". Every one of these hankies came from estate sales. While collecting these over the past year, please were incredibly generous and would frequently give me their grandmothers/mothers/other loved one's hankies because they found out what I was doing with them.


As guest arrived to the wedding we had some yummy homemade cookies and lemonade for everyone to enjoy. Its was apparently a big hit with the ring bearer and flower girls just before their walk up the aisle. (Thanks PMS crew!)
Mason jars with candles were hung from the huge oak trees.

We had a section for "Love Notes for the Newlyweds". We got great notes, tips, and tons of encouragement from friends and family here.
Rather than using all cut flowers (that would be useless after the wedding), we used a lot of potted plants on tables and as decoration around the hall (in addition to the cut flowers).

The entry to hall.

Haley at the Muffin Top Shop made and decorated our cake table. It looked beautiful and it was way better than anything I could have created. The cake/cupcakes were delicous. We also had bumbleberry pies (mix of blackberry, strawberry, blueberry, rasberry, and Rhubarb) from a local (Conroe local) shop called Pie in the Sky. This is a favorite of both mine and Joe's so they were a must have at the wedding.


Gifts were place on the back of an old truck.


Random shots: Next up is pictures during the wedding.